Things We Like: Rainbows Edition

Today started out like any other day: vacuum the shop, put out the "open" signs, straighten all the samples and dust the yarn bins.  With that all done, and still not many people around, we decided to take down the "Christmas trees" window display and put up the "January" windows instead.  This is always fun because it involves standing in the window and hauling things up and down the stairs.

Of course, about 60% of the way through this project, the UPS truck pulled up beside our back steps and delivered the biggest yarn box I've ever seen.  Seriously: this thing was three feet tall and two feet deep (and wide!).  Inside, as we knew, was some very exciting stuff...

We put the box by the counter and kept eyeing it as we finished reassembling the windows.  That done, finally, we opened up the box and found some seriously great yarn:

This is about a third of the new sport weight that we got all excited about ordering last week.  It's 100% wool, plied, and comes in a thousand million colors, of which we have 23.  Excellent stitch definition and GREAT for fair isle & stranded knitting.  Plus, they're 50g skeins, so you can get only as much as you need.

I haven't worked with this yarn yet, but Wendy is making a bright green hat that will be here as a sample as soon as it's done.  (Or, you know, she'll leave it here and spend a week saying "Hey, Joey, why don't you work on it?  You could work on it!")  I picked it up the other day, though, and let me tell you: it's nice.  It's SO BOUNCY... but that might just be because my current project (see below!) is silk and has ZERO bouncy.

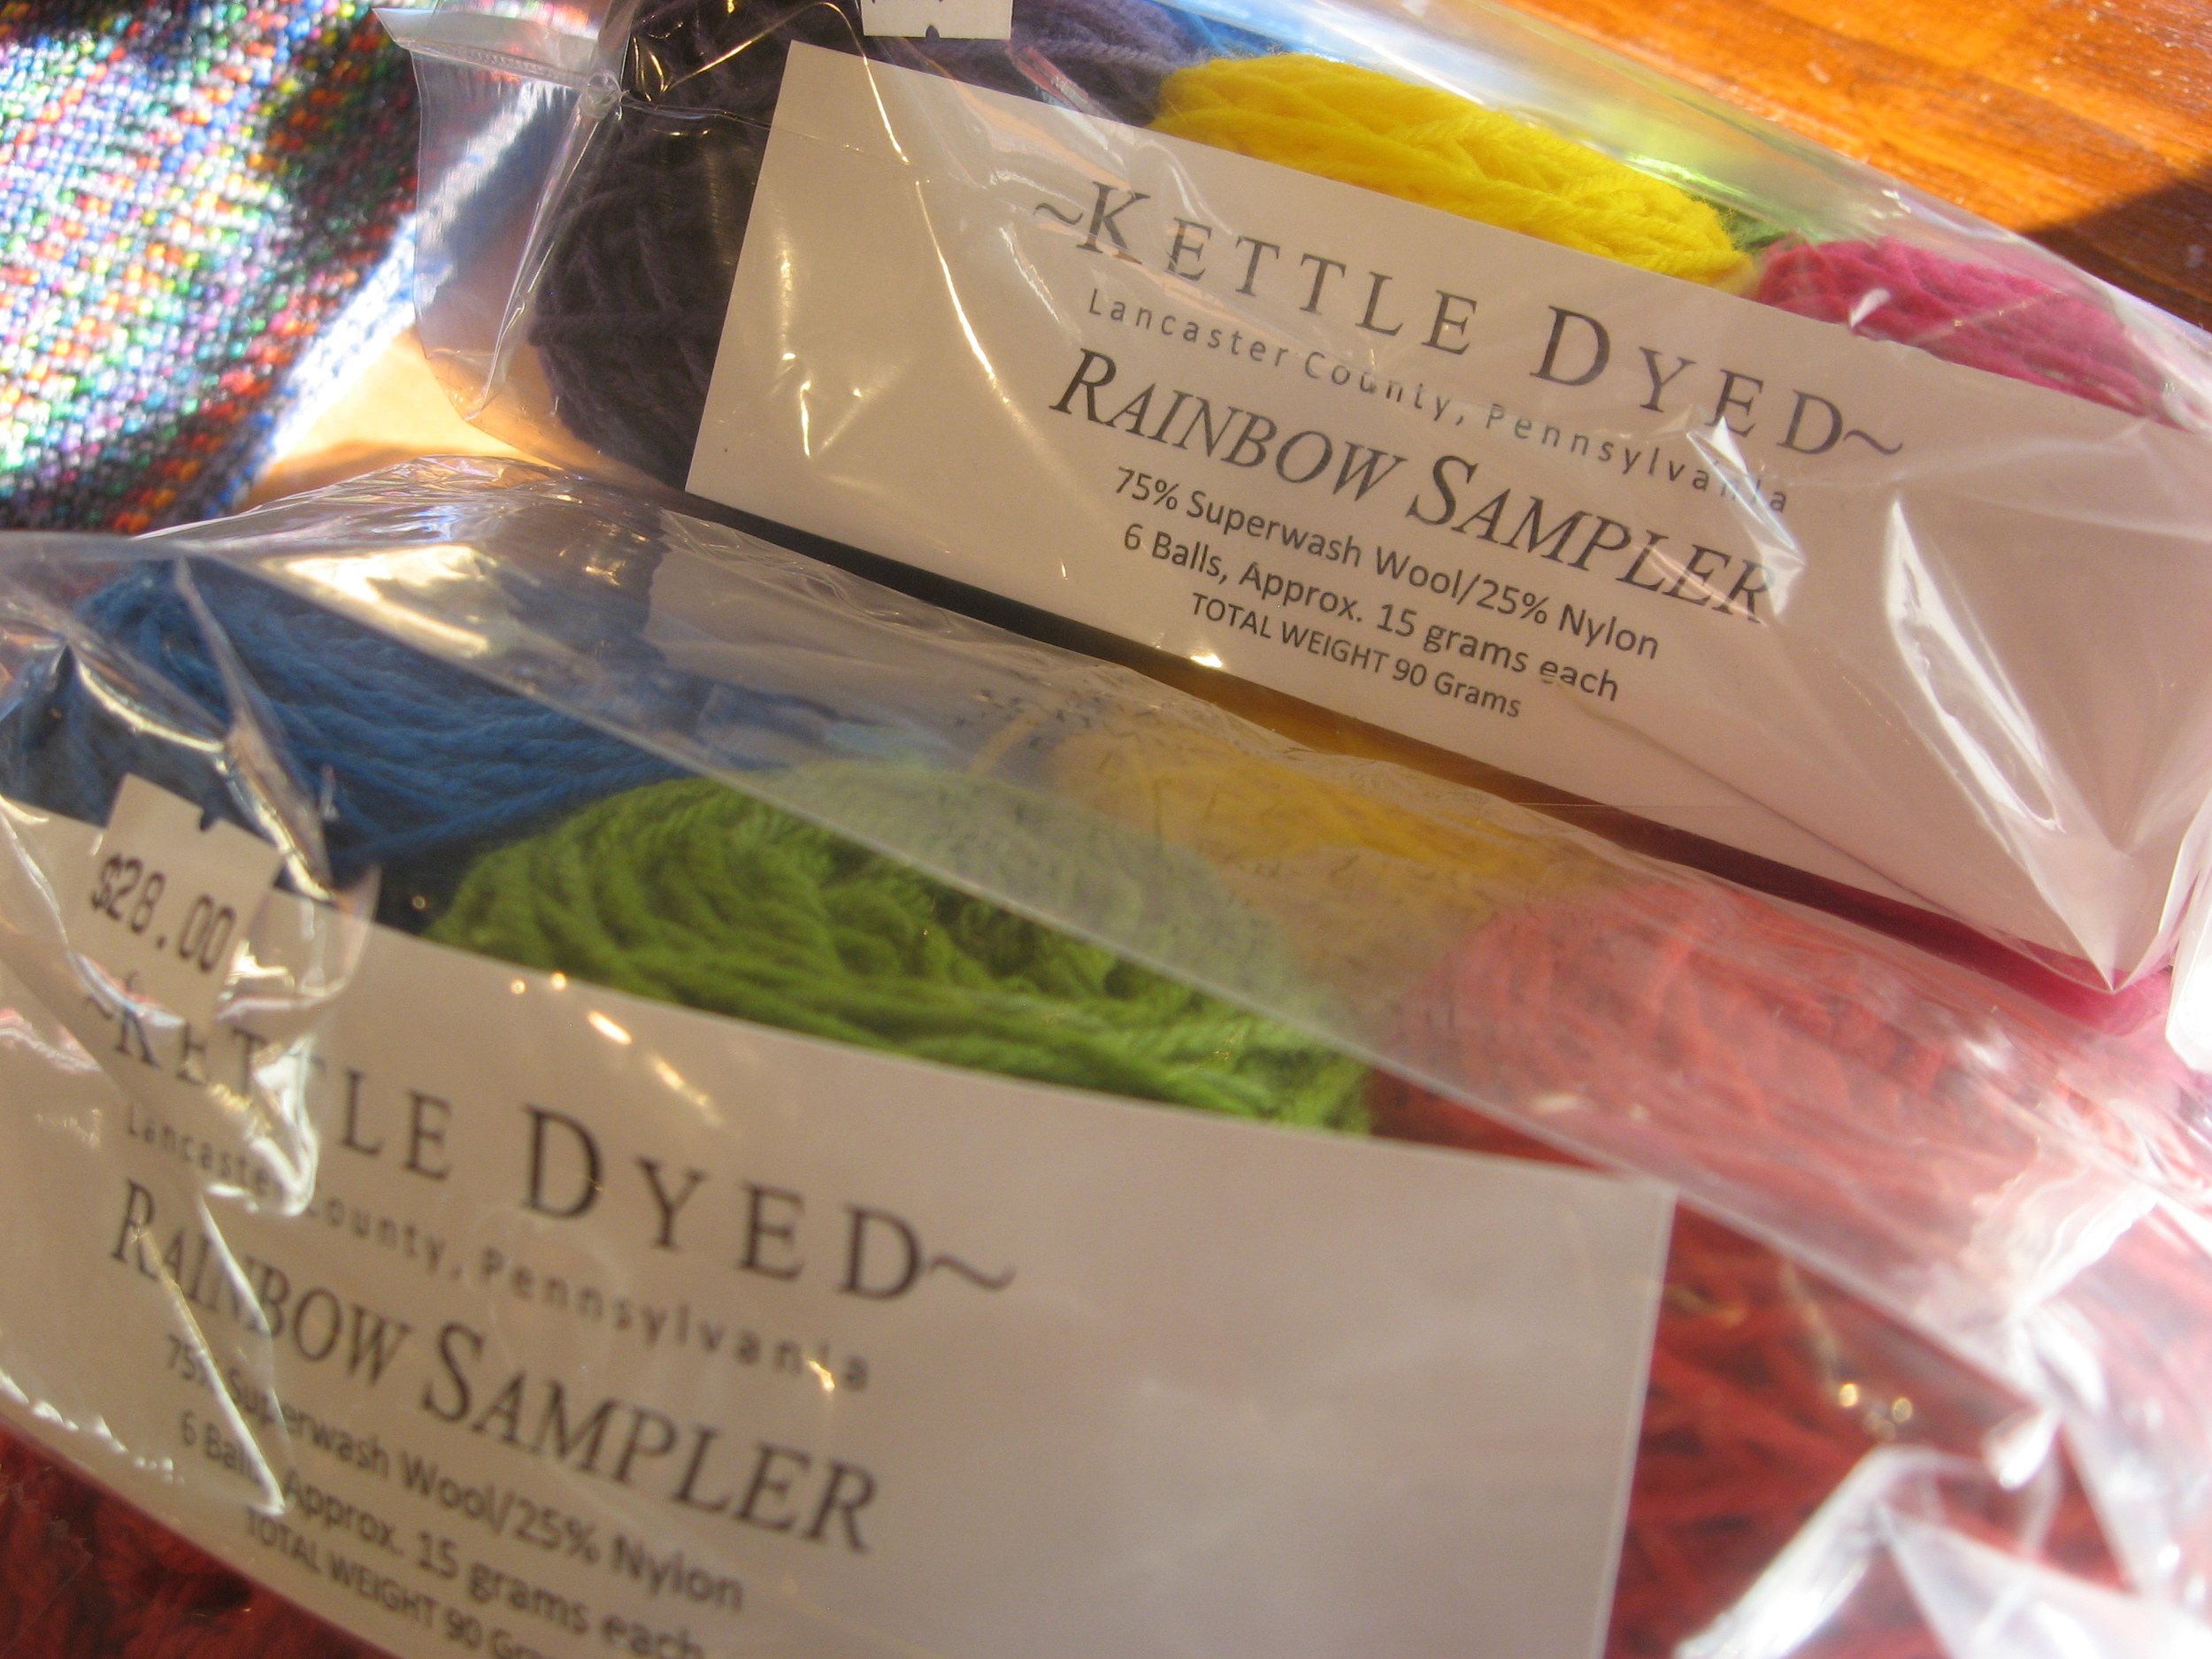
We also got a bunch of the 128 superwash in some seriously good heathered colors, plus two of the multis (colorways 114 and 111).  If you can get here before I hide them all for myself, you can have one too! 

I have worked with this and it's so fluffy you might die.

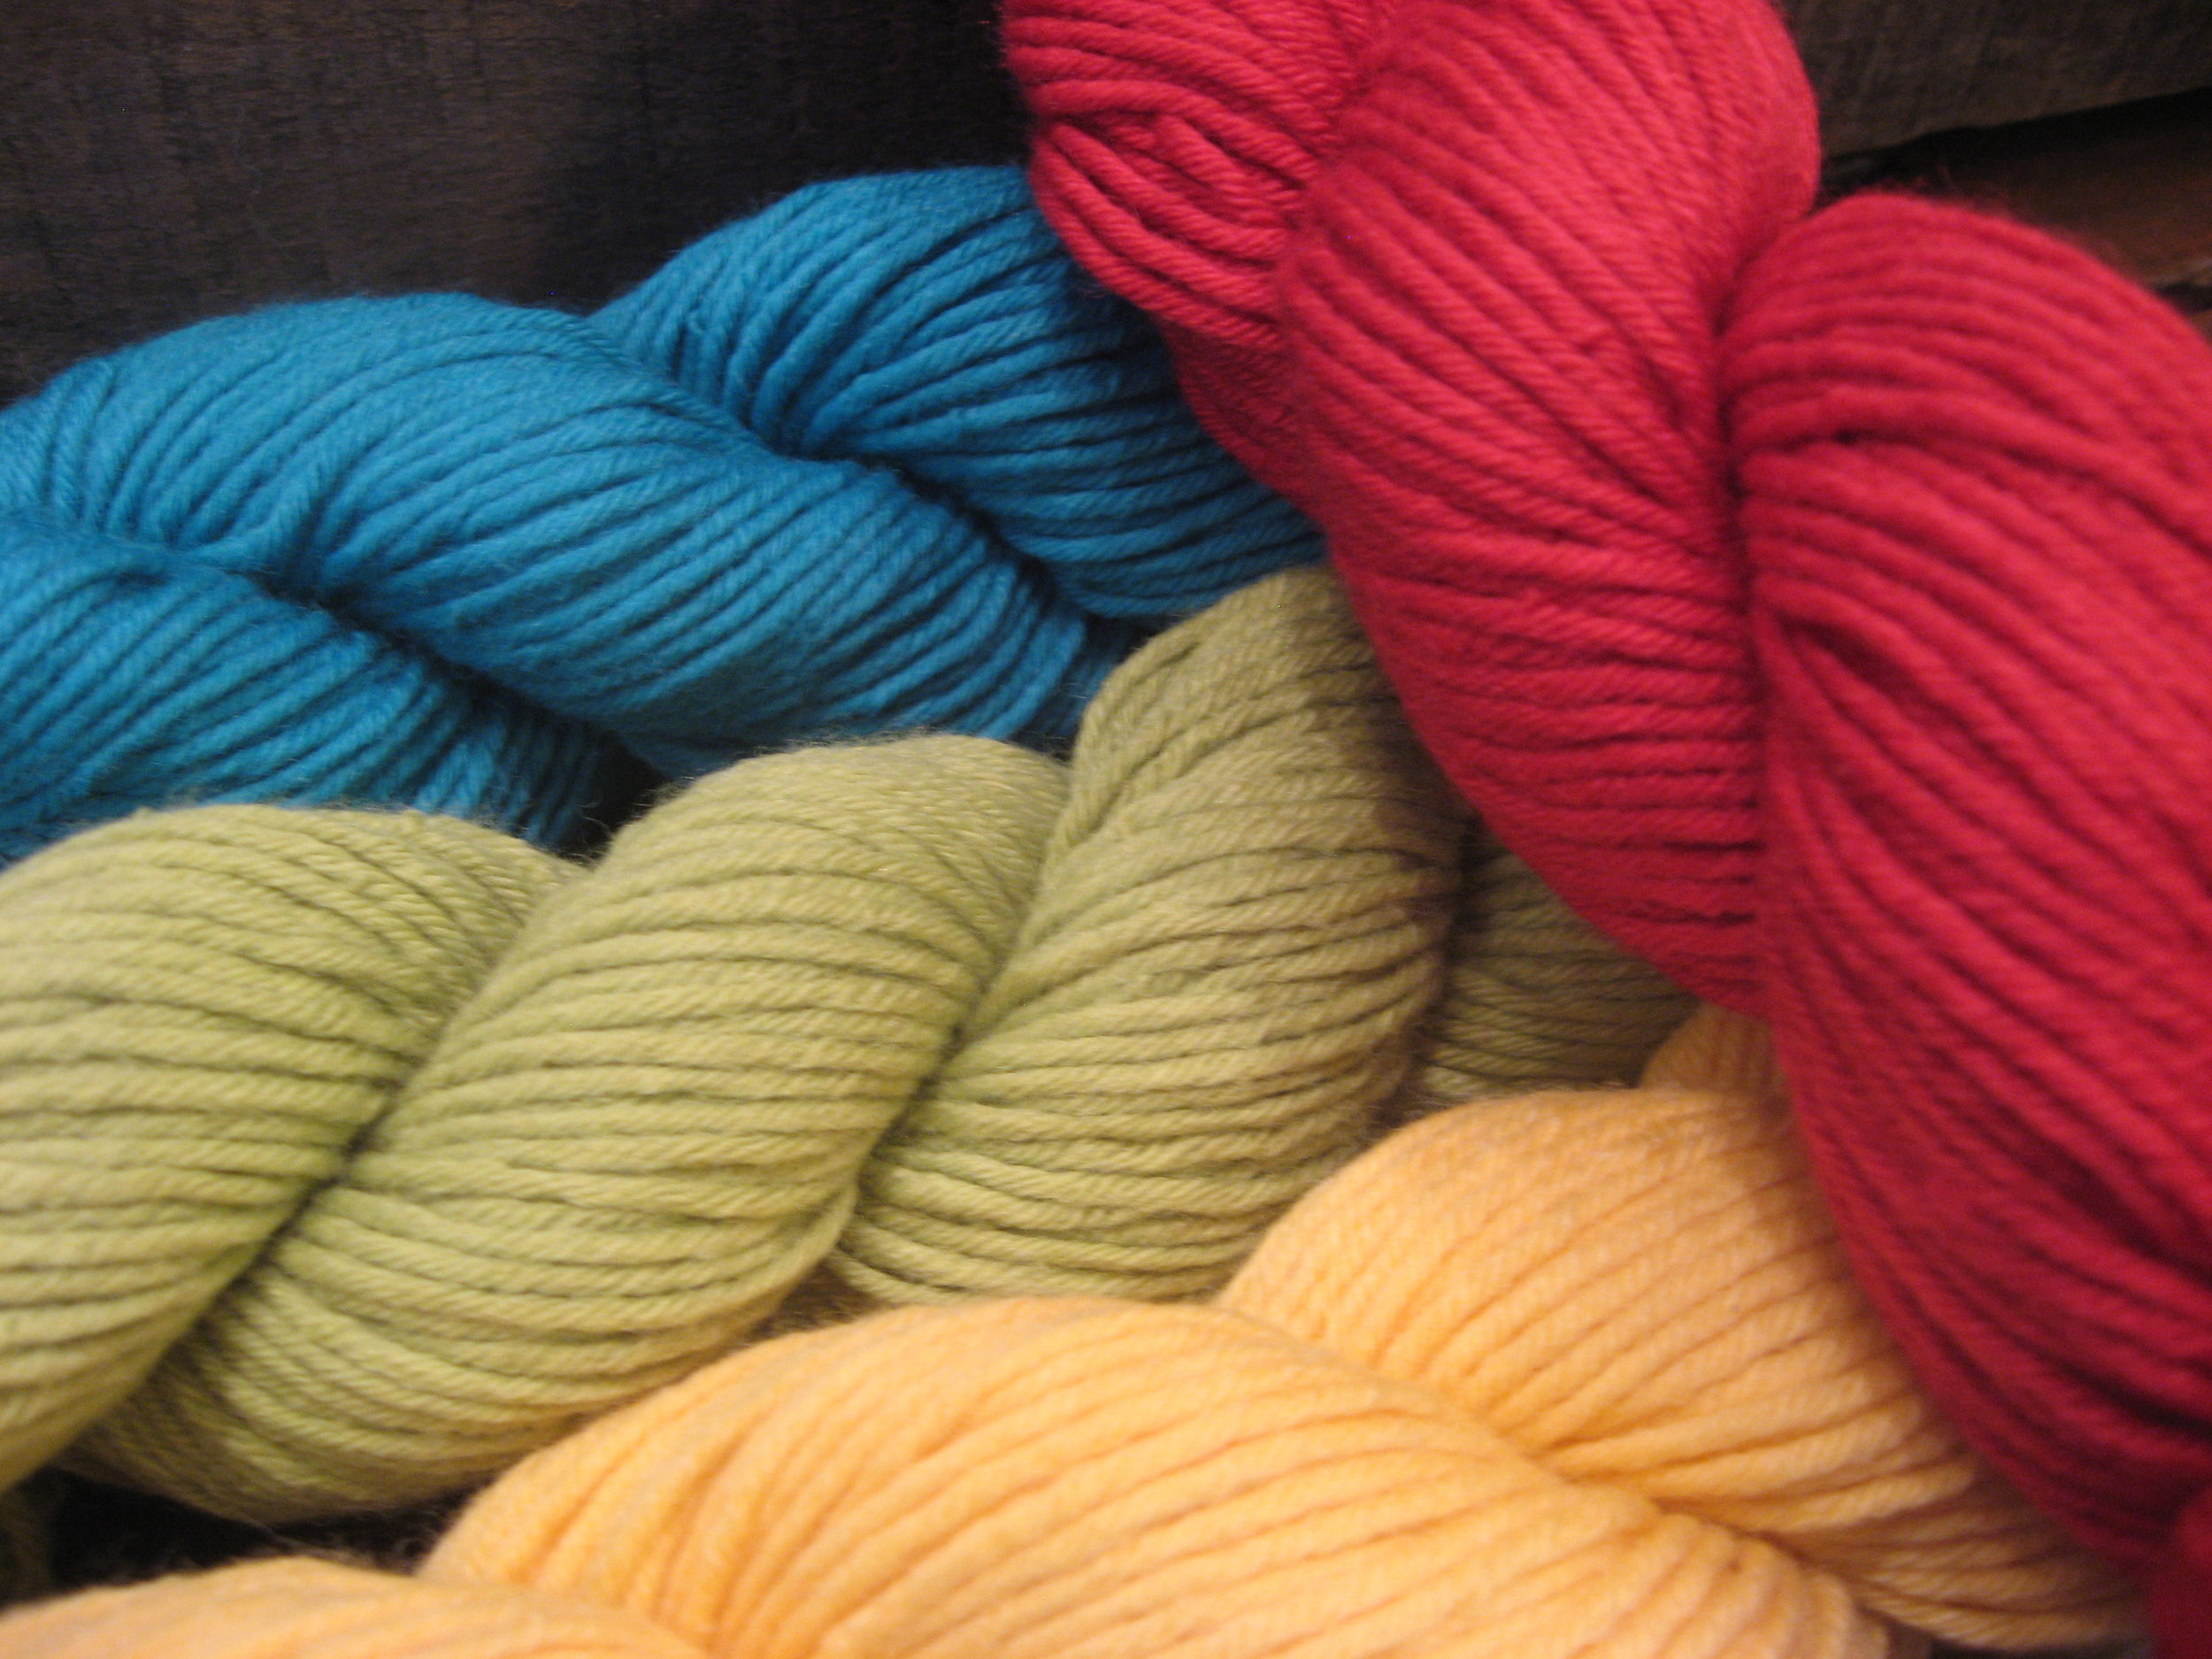
That out of the way: it's rainbow time!

That's a Kettle Dyed rainbow, type A.  You're looking at Lemon Curd, Tucquan Green, Sky Blue Sky, Grape Jelly, Candy!, and Zinnia.

Here's Kettle Dyed rainbow, type B:

And of course we have a Zauberball rainbow:

There are two different flavors of fingering-weight Zauberball: Zauberball and Zauberball Crazy.  The former is a single ply and makes very attractive shawls/scarves, e.g. the rainbow baktus in the background of the above photo.  I've also seen really good hats and gloves. 

The latter is a double-ply yarn the colors of which are crazified, if you will.  Each ply is the same colors, usually offset by about 15 inches.  If you want Zauberball socks, this is the place to go.  Because it's a two-ply, it's just a little bit thicker and will hold up better for the heel and foot of a pair of socks.


Here's my current favorite rainbow, though: Wendy's present!  (It's late.)

It's a baktus, of course, with a few modifications: The shaping is every 6th row, my increases are [k1, kfb], and my decreases are [k1, ssk].  It's yarn I got in New Mexico plus a naturally dyed silk rainbow from Wendy's college days (1985?  This yarn is older than I am!)

If you're interested: the purple is Brazilian logwood, the red is cochineal beetles, the orange is madder, the yellow is woad, the green is woad and indigo, and the blue is just indigo.  If you're in on a Monday or Tuesday before I finish it, just ask and you too can fondle it.  You want to, trust me.

I've never worked with silk before, but now that I've gotten used to it I like it a lot.  It's very different from wool and even from cotton: we all know that wool is springy and forgiving: it doesn't care if you pull on it and if you drop a stitch you can shake your knitting all over and that stitch isn't going anywhere.  Even cotton has a bit of give: not much, compared to wool, but a lot compared to silk.  I've had stitches run all the way down to the next stripe of grey, and let me tell you that picking up stitches in garter stitch is a PAIN.  My poor baktus has heard some words to which something of its tender age should never had been exposed... oops.


There you have it, folks: a rundown of the LYS rainbows as of the beginning of the new year.  Life would be pretty boring if everything and everybody was the same -- so come on down sometime this winter and get your fill of color! 

I promise I won't swear at your knitting.

IMG_5010.JPG

Pattern Deconstruction

Sometimes a hand-knit comes into your life.

I just looked down, and there they were...

I just looked down, and there they were...

These aren't mine, I'm just pretending they are because I like them so much.

They're handmade wool slippers that belong to a friend of mine.  They're comfortable, they fit well, and they're well made.  Naturally, when I first encountered them, I started wondering how exactly they were made -- and whether I could replicate them.

IMG_4953.JPG

Here's the thing about these slippers -- they were knit flat and from the top down.  Because of that, they have a seam up the bottom of the foot; when I said that they are comfortable, I meant "except for the fact that you have to stand on a three-needle bind off ridge that's right in the center of your foot."

And because of that, I decided that if I were to make a pair, they would be done in the round.  I am one of those knitters who has never been able to come up with a reason to knit flat a thing that could be knit in the round; I'm sure there are arguments for flat knitting, but don't mind me, I'll just be over here guarding my DPNs with my life.

Pictured: the reason that flat knitting is evil and hates you (aka the seam I mentioned above)

Pictured: the reason that flat knitting is evil and hates you (aka the seam I mentioned above)

So today I decided to figure out exactly how these were constructed.  Here's what I found, with some pointers on figuring out how a knitted piece was constructed.

The basic information: how much does it weigh?  What's the gauge?  How many colors were used?  Was it knit flat or in the round?

These slippers are 110 grams each and made at 6 sts and 8 rows to 4cm.  This pair was done with four colors (white, black, grey, brown) and the other pair that comes up in the photos below was done with 10 (orange, light orange, grey, pink, green, yellow, blue, olive, black, white).  Obviously there's some flexibility in color choices here.  
Seams are the easiest way to tell whether a piece was done flat: if there are seams, it was probably done flat.  The slippers have a seam at the bottom (the annoying one) and up the back of the heel; they were knit flat.

The next step is to figure out where a piece was begun.  We could tell pretty easily that the ridge at the bottom was a bind-off ridge, meaning that the slipper was started at the cuff.  The other really easy way to determine this is to look at stitch direction, especially if you have a rib with which you can work.

Here's the top of the slipper.  If you flip it over, it becomes clear that the cuff is the cast on, because what you see with it upside down is what we're all accustomed to seeing come off of our needles.

(our round needles)

(our round needles)

Right way up = upside-down knitting

Right way up = upside-down knitting

How many stitches were cast on for the slipper?  If you can find the beginning of the round -- you know what it looks like -- you can count from there.  Again, this is easiest if you are working with a rib, since you can count by twos.  If you're counting stockinette consider putting some other markers in, especially if there are a lot of stitches.  If you come up with an odd (or even a strange) number -- 37 stitches, 103 stitches, 89 stitches -- you probably miscounted. 

Round to the nearest likely number -- for something flat, multiples of 2 are common, but for something round, multiples of 4 are more likely, especially with a k2/p2 rib.  Failing either of those, the closest multiple of ten is always a good place to start.  Usually, by the time you get farther along in your deconstruction, you'll be able to say "oh, there are 48 sts here and 36 sts there, so the right total is 84, not 85."  Don't worry about it too much.

Stitch markers: necessary for knitting in the round. 

Stitch markers: necessary for knitting in the round. 

The slipper has a 40 stitch cast on.  Counting rows is easy: there are 6 rows of color 1, then 4 rows of color 2.  The original slipper in the photos, again, was worked flat, so our unknown knitter would have been working with a long skinny strip of rib, not a tube or a cuff as we sock knitters know them.  

The next part is where it gets interesting: as you can see in the photo below, we have stitches running in two different directions.  The instep (the checkered part) is knit flat, separately from the sides.  I put a marker on either side of the instep flap and counted: there are 14 sts in the checkerboard.  (I then realized that it would have been just as easy to count the checkers and multiply by two.  Well, you can't win 'em all.)

Here's a stitch marker at the bottom of the cuff & the top of the instep flap

Here's a stitch marker at the bottom of the cuff & the top of the instep flap

The instep is knit in a 2 stitch/2 row checkerboard with the yarn held double.  It's 14 stitches across and 24 rows deep.  At the toe, the 14 instep sts are continued down into the front and stitches are picked up along the side.  It seems that the knitter would have worked a wrong side row on the instep, then continued into the side of the slipper with the next right side row.

So: because they were working flat, they probably returned to the beginning of the row (in the cuff sts on hold) and knit across, picking up stitches as they went.  23 sts were picked up on each side of the instep, plus 14 flap sts and 26 cuff sts for a total of 86 stitches.

If I were trying to replicate the slipper in the round, I would work the 14 sts of the instep, then pick up stitches along the side.  When I reached the cuff stitches (on hold), I'd work across those and down the other side, back to the front of the slipper; it's basically the same mechanic as picking up stitches along a heel flap.

Here's what that would look like, having picked up the side sts and knit a few rows:

The whole slipper was done with the yarn held double: the cuff, instep, and sole are solid colors and the side was done with one strand of each: first grey and white, then brown and black.  The sides are brioche, which I've never done -- it took a while to determine exactly what was going on with that part.

The bottom is garter stitch: after 6 rows of brioche rib, the knitter switched back to white and worked 11 rows of garter stitch (again, these were knit flat, so that wouldn't have been the pain it sounds like to those of us who like round knitting).  The seam at the bottom looks like a three-needle bind off, then they wove in the ends and that's that.

IMG_4946.JPG

The ability to deconstruct a pattern is a good one to have -- it lets you say "oh, this sweater is perfect, and here's why it fits really well."  It lets you say "this is the worst sock in the world; I will never use this technique in this way."  It lets you say "hey stranger on the bus, can I look at the inside of your hat for a second?"

It's also really handy for those times when you need to repair a store-bought something.  Hole in your hat?  Take out part of the seam and darn it.  Sweater sleeve just one infuriating half-inch too long?  Take out the cast off, frog a few rows, and re-close it.  Feel like annoying someone?  Undo and redo (badly) one of the seams on their sweater.  They'll never know what happened!

Memory Inflation

I made a cistern spring hat.  I had some row gauge issues, but it was still really great and I wear it a lot.  I had some yarn left over, and I decided to make another one.

IMG_4902.JPG

I decided to re-use the purple and the orange that I had used for the first one, but I swapped out the red for a bright green. 

Cast on 120 sts with the MC, I remembered.  It was a little tight last time -- I cast on 124 sts.  No problem.  Join CC1 and work in corrugated rib for ten rows, I remembered.   I had row gauge issues -- I decided to do 12 rows in each color.

I got through the purple.  I joined the green, I worked 12 rows.  It was starting to look a bit tall, but what the heck, I thought, it'll be fine.  And the last one was too short anyway.

I joined the orange.  I worked 11 rows.  I decided to double check the pattern because while I was fairly sure how the turn and the end of CC3 went, I wanted to check on the number of rows needed after the turn.

I measured the hat somewhere in here.  It was 12 cm tall.  Huh.

I measured my first hat.  The brim was 6 cm.  Well... I wanted it to be taller, right?  I measured the original hat.  Its brim is about 8 cm.  Huh.

I pulled up the pattern, still not really realizing what had happened.  Scrolling down to the turn instructions, I noticed it...

"Round 1: [K1 MC, p1 CC1] around.
Work as set for 6 more rounds."

Ah.  Six rounds.

IMG_4903.JPG

I looked at the hat for a minute, wondering if there was any way that I would be able to salvage what I'd done.  I measured the original hat again.  12 cm of brim would cover the entire body of the hat.

I moved on to bargaining.  Could I live with that?  I could live with that.  Couldn't I?

After a minute, I said to myself "Joey, no one need ever know this happened.  Hide it from Wendy until you're back up to the orange again.  She'll never notice."

The stitches came off the needle easily.  I frogged 11 rows of orange and re-wound it.  I frogged 12 rows of green and rewound that too.  I rewound the grey that was hanging all over the table.   I re-threaded my needle through the stitches of the 9th row.  I frogged three rows of purple and grey.

IMG_4909.JPG

Deep breath.  I like knitting.  This is a chance to do more knitting.  This is a chance to put this hat aside and focus on the gift knitting.  This is a chance to spend more time with the socks I just started.  I like knitting.

Have a good day, y'all.  Americans: happy holiday.  Don't be afraid to frog your work.  Remember: no one need ever know.

Winter is Coming...

It seems like the holidays come earlier every year -- there are pine wreathes on all of the doors today!  And on the way to work today we saw three houses with the full set of inflatables and lights.  Mid-November apparently says "Santa!" to some people...

We've had several knitters who have already begun (or even completed!) their gift knitting for the year come through, and many others coming in to buy yarn with which to start their presents (you have plenty of time!  what's the big hurry?).

There's also been a good number of people coming in to buy things for their knitters.  Y'all are some of our favorite people -- knitters ourselves, we know how great it is to get something knitting-related for [insert winter holiday of choice here].  At the same time, we know it can be difficult to walk into a yarn shop and have no idea what's going on, and that's why I'm gonna give you some ideas.

Let's say you have $20 to spend on your knitter:

Try an assortment of funky tools: the stitch markers (fancy!  handmade!  won't make a gap in your knitting!), a great repair hook (I have four), a pair of scissors in a leather case.  Every knitter needs all of these things, even if they already have some.  You wouldn't believe how often this stuff goes missing... (did I mention that we have measuring tapes?)

We have two in-house pattern kits that come with the pattern and the yarn; both are designed to match colors and patterns found in old Amish wedding socks of the last 100 years or so.  All the needles you'd need are available too -- just ask!

Let's say you have aspiring crafters in your life -- are they little?  Do you need potholders?  The potholder looms are a great place to start your kids/grandkids/nephews & nieces.  The box kit comes with everything you need to make 2 potholders and we have plenty of extra loops.  And if you start them making these now, they'll still want to make them in 20 years... trust me.

If you have an aspiring spinner in your life (or if you think it's funny to give your knitter more things to do with their time), you may want to get them a drop spindle and roving.  We've got wooden spindles that are a great weight for spinning and a bunch of different colors of roving in 1 and 3 ounce bags.  Also good for needle felting, thrummed mittens, and fake beards.

Here's a particular favorite of mine: the kaleidoscope!

And of course we have to mention the YARN JARS.

IMG_4852.JPG

They come in "big" and "small." 


Now let's say you have $30 for your knitter:

Kettle Dyed is will make great socks (one skein makes three socks!), great shawls, great hats, great anything.  Sock yarn is super popular right now, so if you want something good for your knitter, it's always a good bet.  Plus it's locally hand dyed -- who doesn't love that? 

The first photo above is the four colors that arrived today -- Buggy Top, Sage, Grape Jelly, and Flannel Shirt.  If none of those are doing it for you (or if your knitter only wears hot pink), don't worry, we've got plenty of cool colors!  And if you really can't decide, how about a Rainbow Sampler?  Six mini-skeins for the same price as one big skein!


Of course anything yarn-related makes a good gift for the fiber freaks in your life.  We can set you up with everything they (or you!) would need to make a hat (about $25 for yarn, needles, and pattern), a pair of socks ($35-40 for the same), a shawl ($18 to $50, depending on what gets your attention), or anything else you could possibly imagine. 

Can you imagine it? Made by edirks

Can you imagine it? 
Made by edirks

Knitting Bags

We all have one.  It doesn't matter what form it takes -- might be a nice big canvas bag, might be the front pocket of your backpack, might be a project bag stuffed into a purse or a big coat pocket.  No matter what sort of thing you carry your knitting and crochet around in, you've probably noticed that knitting bags accumulate things.

A knitter who shall remain unnamed mentioned offhand yesterday that it would sure be nice to use her big knitting bag again.  We looked at the bag, and an idea began to take shape...

This is the bag in question.

This is the bag in question.

Today, finding myself with a spare hour, I decided to clean out that knitting bag.  I have posted my method here for anyone else who may, upon looking at their knitting bag, realize that they too need to engage in some drastic measures.

Examine the knitting bag.  How big is it?  Would you reasonably expect it to carry, say, a gallon of milk?  A small child?  Determine the likely amount of contents and find a clean surface on which to work.  I used the kitchen table.

Look at the top of the knitting bag.  What's visible?  In this case, it was the circular needle case and a bunch of yarn.  Nothing too surprising, right?

Shake the bag a bit.  Does it sound like there's anything fragile in it?  No?  Good.  (If there is something fragile, you may want to skip this next step.)

Now -- this part is not for the faint of heart, dear knitters, but I believe in you -- grab the bag by the bottom and turn it upside down.

Don't worry, I got permission to do this.

Don't worry, I got permission to do this.

Got that?  Okay, good.  I understand that you may want to sit down for a minute at this point.  It can be traumatizing to do that to your knitting bag, but remember: it had to be done.

Now, we knew what was in this bag, at least a bit.  The Knitter had said that it held "one big project, most of my circulars, and probably some other stuff."  I, knowing what the big project was (a sweater), was expecting to find a quantity of yarn fit for that project (a sweater's worth of yarn).  This was not the case.

Once you have recovered sufficiently to move on, try to sort out what was in the bag.  First, remove any projects, whole or partial, and put them to one side.  If you find more yarn that was clearly intended to go with a project, put that there too.

The inch of sweater was made out of this yarn, so I put a few skeins of this aside.

The inch of sweater was made out of this yarn, so I put a few skeins of this aside.

The goal here is to put like with like and find out what, exactly, needs to be in the ba.  I anticipated returning about a sweater's worth of fingering weight yarn to the bag, but then I realized that the sweater in question was meant to be a fair isle, steeked cardigan, and that there was a LOT of that yarn in the bag.

So I put it in its own pile and turned my attention to other things.

Pictured: a sweater (?)

Pictured: a sweater (?)

From here, dear knitter, you are probably going to have smaller piles.  I ended up with a good deal of the sweater yarn (filed under "partial projects and associated yarn"), a bit of other yarn (something purple, two skeins of a weird variegated yellow-green-blue, odds and ends of other yarn, a piece of grey roving, and some pink embroidery floss).

Here is where things got organizational.  Finding myself short on table space, I put the sweater and all of its yarn back in the bag and hung it on a chair.  Somehow it didn't look any smaller for the yarn I'd removed, but I figured that was probably okay.  (If this happens to you: it is probably okay.)

I got a plastic bag and scooped all of the other yarn and the circular needle case into it.  That's going into the studio -- a room that houses the yarn, the sewing machine, the washer, and a bunch of household detritus that gets sucked in and usually only makes its way out in a big bag marked "GOODWILL."  It's basically the room equivalent of this knitting bag... but I digress.  Anyway, the other yarn is going there.

At the bottom of the bag, as at the bottom of many bags and backpacks, was a thin layer of associated tools.  I found...

  • a single size 3 DPN, 7 inches long
  • a tag for a skein of green Lamb's Pride
  • a button
  • a dime
  • a loose stitch marker
  • a small plastic bag containing two stitch markers and another button (different from the first button)
  • a cable protector for an mp3 player
  • a plastic envelope full of LYS business cards
  • an unopened bag of heart shaped stitch markers

All in all, this wasn't a bad bag.  Everything in it (with the possible exception of the dime) is something that one would expect -- or even want -- in a knitting bag.  The problem, as the owner of this bag said, is that because there were things in it that are not associated with the Big Project, she hadn't touched the bag in weeks, and so everything in it was effectively lost. 

So, dear knitter, now that you have made it to the end of my adventure... I challenge you: clean out your knitting bag.  You too can salvage projects, find your findings, and recover use of your favorite project container once more. 

Take some pictures of the process (and the product!) and send 'em to us over here at the Facebook page.  One (1) free internet to the taker of the best picture!

New Pattern!

Because you need more things to knit, we have a new pattern!  It's a worsted weight, two-color hat in Lamb's Pride: 

IMG_4757.JPG

Here's a link to buy it on Ravelry.  We'll have it in print here at the shop soon too!

Protip: worsted weight hats make good holiday gifts.  Can you say "this doesn't take eighteen hours to knit"?  And look how stylin' our model is!  Just imagine: you too can be that fancy.